Logo crashrpt
A crash reporting system for Windows applications

Configuring Your Project's Build Settings

Include and Lib Directories

At this point you should have the CrashRpt source code compiled as described in Compiling CrashRpt.

To let your Visual C++ compiler and linker know about the location of CrashRpt include and lib files, do the following.

If you use Visual Studio 2005 or 2008, open menu Tools-> Options. Then in appeared dialog, select Projects and Solutions->VC++ Directories.

If you use Visual Studio 2010 or 2012, open the Property Manager window, multi-select all projects in your solution and right click the selection. In the appeared dialog, open Configuration Properties->VC++ Directories.

Finally,

Here <CRASHRPT_HOME> should be replaced with the actual path of the directory you unzipped CrashRpt distribution to.

Before you start using CrashRpt API functions in your program, do not forget to include CrashRpt.h header file in the beginning of your code:

// Include CrashRpt header
#include "CrashRpt.h"

You also need to add CrashRpt LIB file to the list of input libraries for your project. In the Solution Explorer window, right-click your project and choose Properties item from the context menu. Then open Configuration Properties->Linker->Input->Additional Dependencies and then add CrashRptXXXX.lib to the list of libraries (here XXXX should be replaced with CrashRpt version number).

Using CRT as Multi-Threaded DLL (/MD) in Release Configuration

It is important that you configure your project to use C runtime libraries (CRT) as Multi-threaded DLL (/MD) for Release configuration. This is the way recommended in MSDN. See the Exception Handling and CRT Linkage section for more information.

In the Solution Explorer window, right-click your project and open project Properties. Then choose Configuration Properties->C/C++->Code Generation. In the Runtime Library field, choose Multi-threaded DLL (/MD). See the figure below for example.

This should be done for all projects in your solution to share single CRT DLL.

Note:
In Debug configuration it is not important what CRT linkage you use. Typically your default debugger intercepts exceptions instead of CrashRpt in Debug configuration.
crtdll.png

Multi-threaded DLL (/MD)

Using the Same Version of CRT for All Application Modules

Ensure that all modules that exist in your application use the same version of CRT. If some dependent modules were compiled using an older version of CRT, you should recompile them to ensure the single version or CRT DLL is used.

For example, assume you use Visual Studio 2008 and CRT 9.0 linked as DLL, but some dependent module in your application was compiled in Visual Studio 2005 and uses CRT 8.0 linked as DLL. In such situation a CRT error in the dependent module won't be intercepted by CrashRpt, because error handlers are installed for CRT 9.0 only.

Enabling Program Database (/Zi, /DEBUG) in Release Configuration

To be able to recover the stack traces from the crash minidump, the debugger needs your application's debugging symbols (PDB files).

To enable the generation of PDB files:

  1. In the Solution Explorer window, right-click your project and open project Properties. Then choose Configuration Properties->C/C++->General. In the Debug Information Format field, choose Program Database (/Zi).
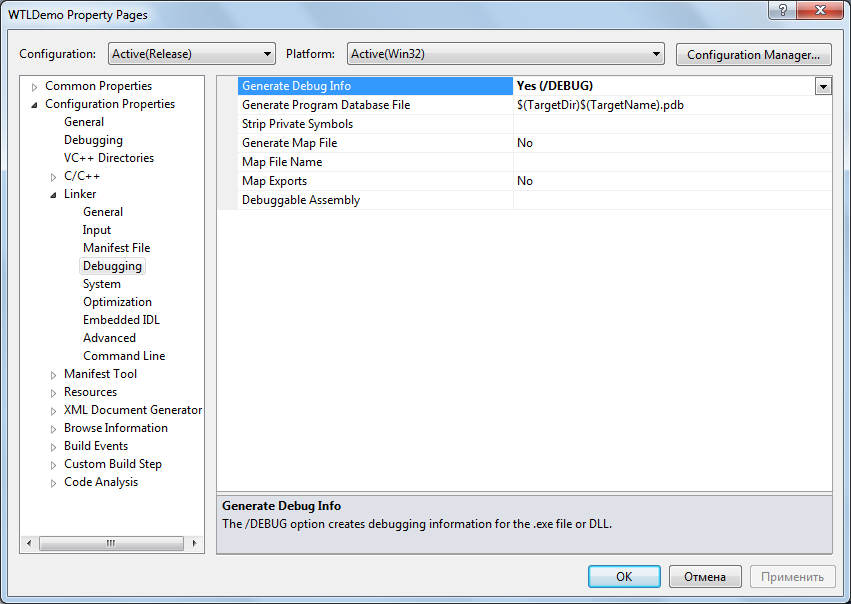
  2. Choose Configuration Properties->Linker->Debugging. In the Generate Debug Info field, choose Yes (/DEBUG).

Steps 1 and 2 should be performed for all projects in your solution that support program database (EXE, DLL).

The steps 1 and 2 are presented on the figures below.

program_database.png

Program Database (/Zi)

linker_debug_settings.png

Enabling Debugging Information in Linker (/DEBUG)

Disabling Frame Pointer Omission Optimizations

We recommend turning off Frame Pointer Omission (FPO) optimization in release version configurations, as this optimization does not really give an appreciable gain, but greatly complicates the analysis of the dump: the /Oy compiler option makes using the debugger more difficult because the compiler suppresses frame pointer information. Moreover, in Visual Studio 2010 this optimization is disabled by default.

To disable the FPO optimization:

  1. In the Solution Explorer window, right-click your project and open project Properties.
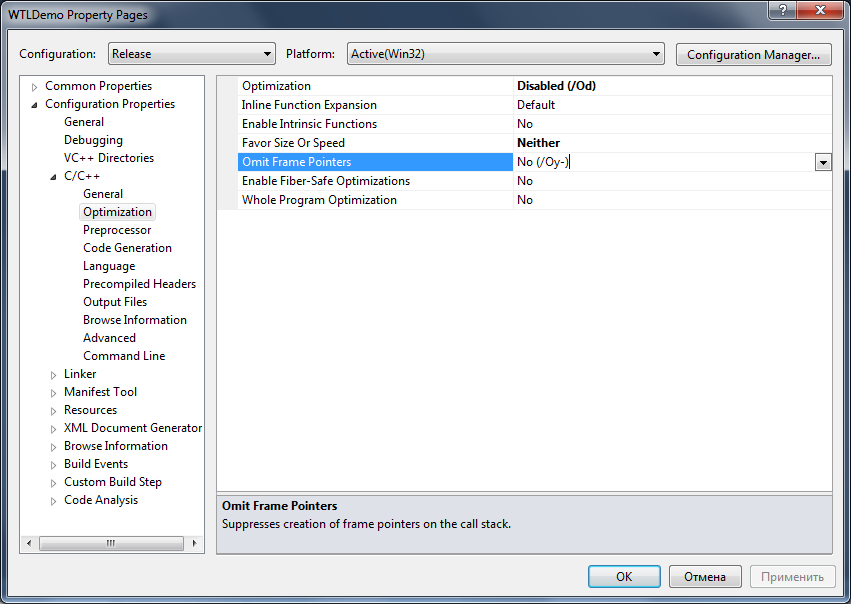
  2. Choose Configuration Properties->C/C++->Optimization.
  3. In the Omit Frame Pointers field, choose No (/Oy-).

disable_fpo.png

Disabling Frame Pointer Omission Optimzation (/Oy-)

Note:
If you can't afford yourself to turn the FPO optimization off, you can manage an error log file which is not affected by optimizations.
Further reading: Using CrashRpt API.

Generated on Wed Apr 29 10:17:31 2015 for CrashRpt by doxygen 1.5.9